Composting is the simple process of layering organic matter together and waiting for the material to break down and decompose which can be added back to your soil. Compost should not be used alone as a growing medium but should be thought of as a component of healthy soil. Starting a compost pile in your backyard is an easy way to produce organic matter which can be mixed into your garden and flower beds for a healthy soil to produce a bounty of vegetables and beautiful flowers.
Benefits
There are many benefits to composting. Adding decomposed compost to your soil is an excellent way to improve the soil by adding nutrients that may be lacking as well as amend the texture by making it loose, fluffy and able to remain moist but not stay wet. Microscopic organisms that live in compost and help break it down will be added to your soil and are another benefit. As the organisms break down the organic matter it helps to aerate the soil which will help plants grow by giving room for roots to grow and water to flow. Using compost is also a great alternative to chemical fertilizers which can sometimes be washed off in your yard’s run-off and eventually make its way to your local water table.
Composting can help reduce your waste. By collecting kitchen scraps and yard waste you won’t be filling up your garbage cans as quickly. Sometimes you can reduce your waste by up to 30 %. This can help you cut down on your garbage bill and will make you feel good about doing your part not to fill up the landfill.
How to start composting
To begin wait until you have enough material to pile at least three feet deep.
Location and bin
Next you‘ll need to select a location in your yard. Pick a place that is out-of-the-way, accessible, and convenient to reach. It is a good idea to start the compost pile on bare earth so that worms and other beneficial organisms can help aerate the compost and break it down. You will probably want some sort of container to corral the compost and keep it in one location. You can buy a bin or build your own.
Layers
The first layer should be sticks, twigs, or straw. Pile these things a few inches deep to help with drainage. After this you’ll want to alternate layers of green and brown materials. Layers should be four to eight inches deep. Green materials include things like kitchen scraps, fresh leaves, grass clippings, and coffee grounds. Brown materials include things like dried leaves, straw, and shredded paper.
Cover and turn
Keeping the compost pile covered is optional. A cover such as a plastic sheet, wood, or carpet scraps will help the pile retain moisture and heat which will help things break down faster. Water the pile occasionally. The material should be moist, not wet. Every few weeks you will want to turn the pile with a pitchfork or shovel. This helps aerate the pile and adds oxygen to lower layers. After you pile is established you can add new materials by mixing them in.
What to Add
Every healthy compost pile should have a good mixture of materials that provide two things. The ‘green’ materials add nitrogen to the pile and the ‘brown’ materials add carbon to the pile. Most compostable materials will add either more carbon or more nitrogen to varying degrees and thus fall into either the green or brown category. For the microorganisms in your compost they need a good ratio of carbon to nitrogen. Things will break down much faster when you have the proper ratio. The carbon is used as a source of energy and is a building block of life. Nitrogen provides protein and other elements essential to cell structure. The approximate ratio you’ll want to strive for is 30 parts of carbon to 1 part of nitrogen. If you have too much carbon the pile won’t break down very quickly; too much nitrogen and the pile becomes a smelly mess. A good rule of thumb is to try to use two parts of brown materials to 1 part of green materials when you start your pile. This should give you a good carbon to nitrogen ratio. As you add to your pile try to add a ratio of one part green to one part brown.
Green materials
Green materials add nitrogen to the pile. These are generally things that are fresh and moist such as fruit and vegetable scraps, grass clippings, eggshells, green leaves, manure, and coffee grounds.
- Fruit and vegetable scraps
- Eggshells
- Green leaves
- Grass clippings
- Flower cuttings
- Teal leaves
- Manure
- Coffee Grounds
Brown materials
Brown materials add carbon to the pile and are called brown because they are materials that are dry. These include things such as dry leaves, bark chips, shredded newspaper, straw, finely chopped twigs or sticks, and sawdust.
- Brown leaves
- Straw or hay
- Shrub pruning
- Pine needles
- Wood ash
- Shredded paper or cardboard
- Corn cobs and stalks
- Sawdust (from untreated wood)
- Wood chips
- Dryer lint (from natural fibers)
After your compost pile is established and you start adding to it you may want to add a layer of soil over the top to help mask odors. Large materials such as sticks and branches should be chopped up into smaller pieces so they will break down faster.
To easily collect kitchen scraps keep a bucket with a lid under your sink. When the bucket is full add it to your pile.
What not to add
Do not ad d things like meat, bones, fish scraps or dairy products to your pile. These things will attract pests. Weeds that go to seed and diseased plant material should not be added as they may spread as you add compost to your soil or they may start growing in your compost pile. Pet manure should not be use as it may spread disease. If you add sawdust be sure it is from untreated wood and be sure to mix well to avoid clumping.
Methods of Compost
Bin
Using a bin is one of the most common ways to hold composting materials. You can build your own structure out of wood or masonry brick. A square measuring four feet is a good size to start. The top of the bin is opened to allow easier access to the material when turning. You can also build an opening at the bottom for easier access to the material that has broken down and is ready to add to your soil. If you aren’t handy or are not interested there are plenty of options for buying a compost container. Turning the material can be difficult in a bin. You don’t need to turn the material, just know it will take longer to break down if you don’t. Portable bins are available for decks or apartments.
Pit
If you aren’t enthused about an unsightly compost pile consider pit composting. This entails digging holes or trenches to bury your waste. After the hole is filled you cover it up and let nature work its magic. The material should be covered with at least 8 inches of soil. There is nothing else you need to do. Buried materials will take longer to break down so this is a good method for enriching an area that you will later plant in. If you plan on burying kitchen scraps in your garden set up a yearly rotation. The first year use part of the garden for growing and another part for composting. The second year use the composted area for growing and the previously planted area for composting.
Enclosed
Enclosed compost units are typically made of plastic and have a lid to close the container. The bottom of the container is open so the material drops out when the bin is moved. There is typically an opening toward the bottom of the container to allow access to the compost. It can sometimes be difficult to harvest from the container. These are best for suburban and urban areas because of their size and appearance. Another typed of enclosed system are the tumbler units. These are big drums which you can spin to mix up material and introduce oxygen to more parts.
Sheet Composting
If you are short on space or don’t want to start a pile, sheet composting would be a way to reap the benefits of composting. Sheet composting involves spreading a thin layer, such as leaves, grass clippings, or food scraps, over an area and then mixing it in. Materials are mixed in using a tiller, garden fork, or hoe. Materials should be shredded or broken into as small of pieces as possible to aid in decomposition and to make the mixing either. Sheet composting works best in the fall. Spread a layer two to four inches thick then mix in. Plant vegetables, flowers and other plants as usual in the fall.
Trouble shooting
Flying insects
Fruit flies are often attracted to the vegetable and fruit matter in compost piles. You can discourage fruit flies by covering the scraps. Keep a pile of grass clippings or leaves next to your pile to cover new additions. You can also discourage flies by adding calcium or lime.
Smelly compost
Sometimes keeping a collection of kitchen scraps under your sink can start to get a little stinky. You can reduce the odor when you add these scraps to your compost pile by covering them as soon as you add them. Use grass clippings, mulch or dried leaves. Calcium and lime can also be used to eliminate odors. If you notice your pile smells like ammonia it means your pile is low on carbon. Add some more carbon-rich or brown materials.
Steaming pile
This is a good thing! That means the microorganisms are working hard to break down your waste.
Soggy pile
This can happen when there is too much green material and not enough brown. Add some carbon materials to help aerate and drain the pile.
Materials are clumping together
When leaves and grass become wet they can stick together making clumps which is hard for oxygen to make its way through the pile. You can prevent this by making a pile next to the compost and slowly add them in with other materials. Alternatively you can break them up with a pitch fork and be sure they are well mixed.
Racoons and other pests
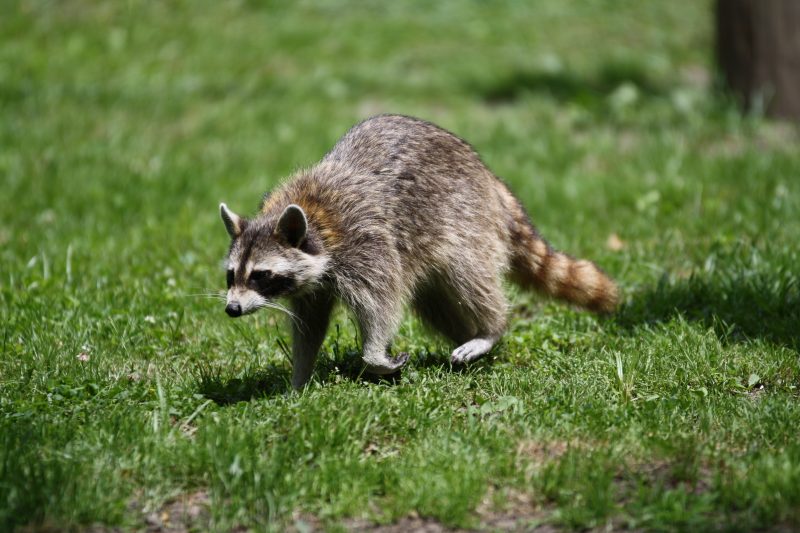
Raccoons, in an urban setting, can be considered scavengers and will eat whatever they find. Your compost pile is a treasure trove. To prevent raccoons and other pests from visiting be sure you don’t add any animal products, other than eggshells, to your compost. This means meat, dairy, or even vegetarian ‘meat.’ Don’t add any oil or greasy foods and don’t add any sort of grain. If you really want to add bread be sure to soak it until it falls apart. If this doesn’t solve the problem you will need to pest-proof your bin. Cover your bin with wire mesh or a tarp and be sure it is held down with something heavy. If you are worried about varmints tunneling under the bin you should lay chicken wire down at the bottom.
No Comments