Using fresh herbs in your cooking is a great way to add an extra freshness and burst of flavor. You can easily grow herbs in your garden over the summer for a special addition to any meal and to celebrate the freshness of the season. Learn how to preserve those herbs so you can use them in your kitchen all year long.
There are several different types of herbs to cook with and to grow. Herbs are generally pretty low-maintenance and some of the easiest things to grow in your garden.
Basil
Basil is an annual that grows very quickly in hot weather. One plant that is well-maintained can produce up to ½ cup of packed leaves a week. That is a lot of basil to add to your cooking. Basil can be planted from seed or you can purchase seedlings. If you are planting seeds plant them six weeks before the last frost spacing 12 inches apart. If you are planting a transplant be sure the soil temperature is at least 70 degrees. Basil plants are very sensitive to cold. Be sure to protect your plants if you have a late frost. Basil can be planted in containers or the ground. They do equally well in either.
Basil needs at least 6 hours of sun a day and do best in locations that are shady in the afternoons to save them from the roasting mid-day sun. Plant in moist, well-drained soil with a pH of 6 to 7. Not much is needed in way of fertilizer or soil amendment. Some compost added at the beginning of the season will be fine. Basil leaves may not be as flavorful if the soil is too rich.
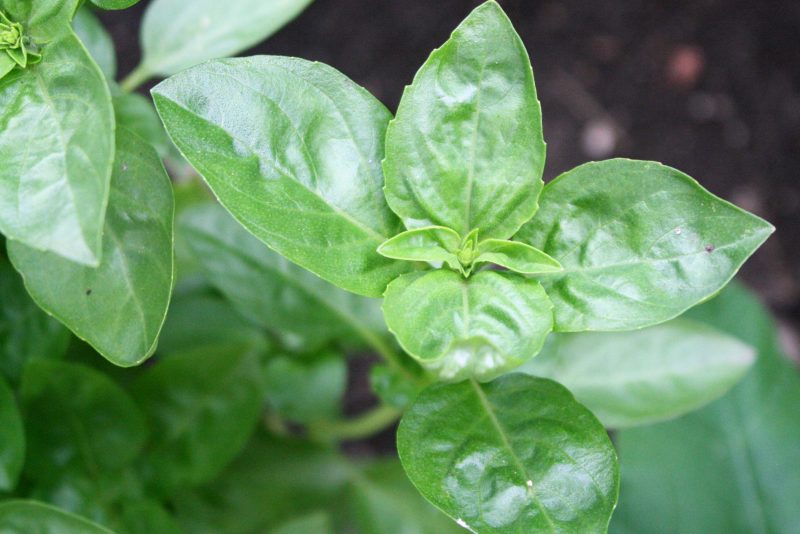
The leaves of the basil plant may be harvested any time after the plant has reached a height of 6 inches. Pick the leaves from the tips of the stems to encourage the plant to branch and make more leaves. Try to prune the plant regularly to encourage leaf growth even if you don’t use the leaves. Without regular pruning the plant will begin to flower and make seeds and stop producing leaves. If you happen to miss a pruning and the plant begins to flower, no big deal. Simply pick the flowers off to direct the plant to use its energy on leaves not seed production.
Harvest and Preservation
Before your first frost harvest all the leaves from the plant. Leaves will turn black in cold weather and will not recover. You can easily do this by pulling or cutting down the whole plant then picking off the best leaves.
Add basil leaves to your dishes within the last 5 to 10 minutes of cooking time for the best flavor. Too much cooking will cause the basil to lose flavor. Basil is tasty in tomato dishes, soups, stews, pastas, and salads. It pairs well with parsley, rosemary, oregano, thyme, and/or sage.
Extra leaves can be saved by drying or freezing. Basil tends to loose flavor when dried so freezing is best. You can also preserve the flavor in vinegar, oil, or pesto. Oils and pesto should be stored in the refrigerator or frozen until ready for use.
Basil stems can also be kept fresh in a vase of water. They can be enjoyed as if they were cut flowers or eaten as needed.
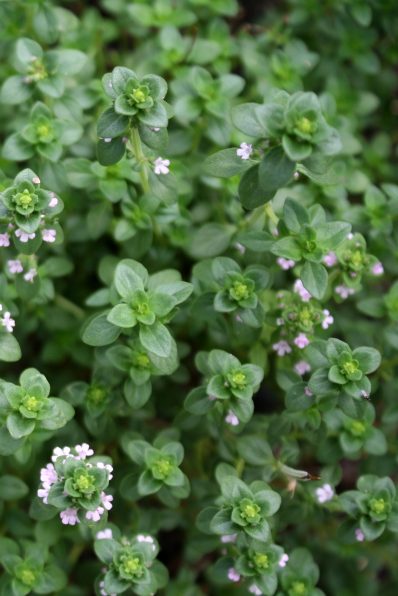
Parsley
Parsley is an annual that grows to about a foot tall with lovely, green foliage. There are two varieties flat-leafed parsley, and curled leaves. The plant can be used in flower beds to contrast colorful flowers as well as grown in the garden or in containers.
Growing Parsley
Parsley is considered a biennial. Parsley will die back during the winter and will return the following spring. However once the plant blooms the second spring it will quickly go to seed while developing a tap root. The leaves, at this point, are not as flavorful and will be sparse. You may pull the plant and start a new one in order to harvest leaves or you may let the old one bloom and seed. Bees love the flowers and you can collect the seeds that develop to plant the following year. You can harvest the tap root in the fall if you choose. The tap root is a large root similar in shape and size to a carrot. It is considered the most flavorful part of the parsley plant.
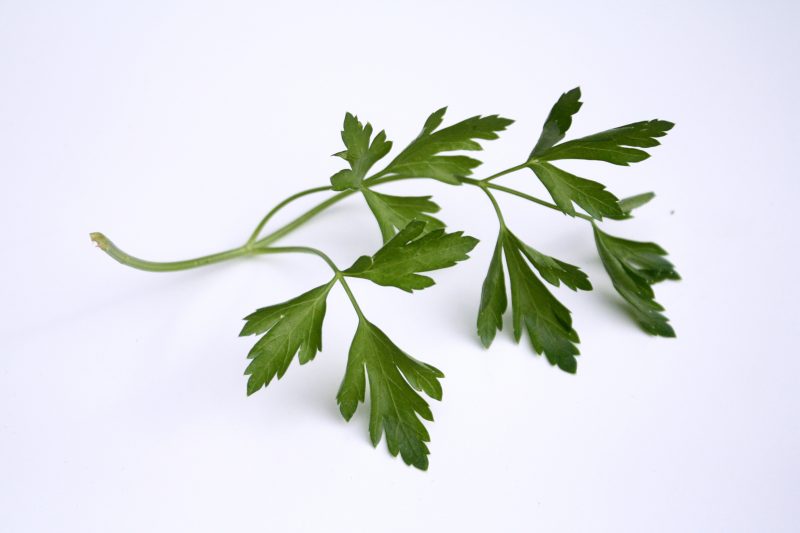
Parsley may grow in full or partial sun in rich, moist, and well-draining soil. The soil pH should be between 5.5 and 6.7. Help the soil retain moisture by mulching around the plant. Don’t cover the crown of the plant with mulch or it may rot. If you have very hot summers consider planting flat-leaf parsley as it is more heat tolerant than curly parsley.
Harvest and Preservation
The stems and leaves of the plant may be eaten. Don’t throw the stems out as they have a stronger flavor than the leaves. Chop the stems finely for easy consumption. Harvest as needed by cutting the stems from the outsides of the plant. Leave the inner stalks and leaves so the plant will continue to grow.
Chopped parsley should be added at the end of the cooking process or sprinkled over the dish immediately before serving. It goes well on salads, vegetables, egg dishes, meat dishes, pastas, rice, soups, potatoes, and herb butters.
Extra parsley leaves can be frozen or dried. Frozen is recommended as dried leaves tend to lose their flavor.
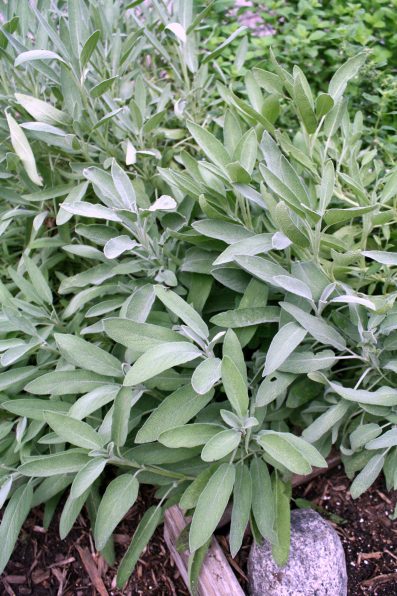
Sage
Sage is an easy-to-grow herb that takes the form of a low shrub in the evergreen family. It is hardy and has a long growing season. Unlike delicate herbs like basil and parsley sage may survive the first frost and you may be able to harvest sage into the fall. The leaves of the sage plant are a soft green and are very fragrant. The flavor of the leaves intensify as the plant grows and won’t lose flavor when the plant begins to flower. It is drought-tolerant and low-maintenance.
Growing Sage
Sage is a perennial plant and grows well in most climates and temperatures. Plant in the spring spacing seedlings 18 inches apart. You may start plants from seeds or transplants. Sage will taste best in full-sun locations. Be sure the soil is moist and well-draining with a pH between 6 and 7. Don’t use too much fertilizer as it may cause the sage to be bland in flavor. You may also choose to grow the herb in a container.
Cut back the sage plants in the early spring every year to get rid of the old growth and allow new growth. This also helps keep the plant from getting too woody which sometimes causes the leaves to loose flavor. Even with annual pruning sage plants may stop growing and become woody after 3 to 5 years. At this point you may want to pull up the plant and start a new one. Pink or purple flowers will begin to grow on the plant in late spring. There is no need to pull the flowers.
Harvest and Preservation
Harvest sage as needed. You may cut whole branches or pinch individual leaves. Consider two big harvests during the growing season to encourage an evenly shaped plant. Cut back half the plant each time. Wait more than 2 months to do the second harvest, right before the first frost.
Extra sage leaves can be dried or frozen. Sage is an excellent herb for preservation as it does not lose much flavor in the drying process. Use it fresh or dried in pork, poultry, sausage, stuffing, and vegetable dished. It is the herb to use for Thanksgiving. Fresh sage is generally added earlier in the cooking process to allow the rough leaf to break down a little.
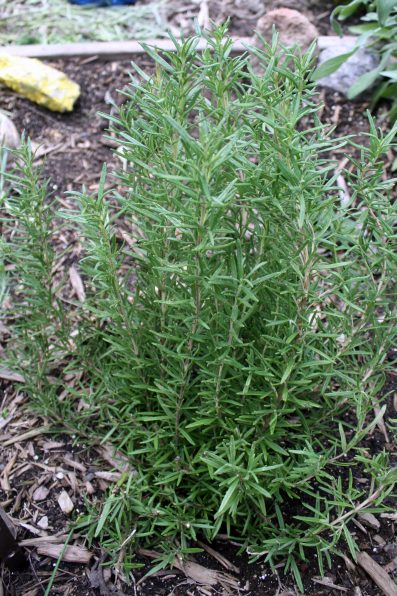
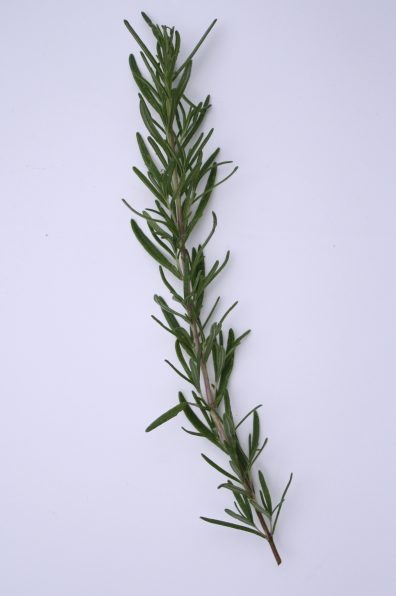
Rosemary
Rosemary is a perennial evergreen plant with a woody stem and needle-like leaves. It has a wonderful pine-like scent and makes a beautiful plant for landscaping. It usually gets up to 3 feet tall and can get up to 5 feet tall in warmer climates. Rosemary can be used as hedges in warmer climates (zone 8 and warmer) and even trained into topiaries.
Growing Rosemary
Plant rosemary in the spring 2 to 3 feet apart. You may plant seeds or transplants. It is a slow grower the first year so if you buy a plant consider buying a larger one so you’ll be able to harvest more leaves the first year. Rosemary should be planted in full sun, but can tolerate partial shade. Soil should be well-draining with a pH of 6 to 7. Rosemary does equally well growing in containers which means they are mobile and can be brought indoors when the first frost hits.
Harvest and Preservation
Harvest the leaves by cutting stems anytime you’d like. There is not a necessary location to cut stems as the leaves grow quickly on the stems and new stems will from where you cut. Be sure not to cut stems all the way to the base of the plant otherwise none will grow back.
Extra rosemary can be saved by drying or freezing. If you dry the leaves don’t crush them until you are about to use them as crushed leaves lose their flavor faster. Rosemary can also be used to flavor butter, vinegar or oil. Use fresh rosemary on lamb, pork, chicken, veal, soups, stews, vegetables, and breads. It is a very fragrant herb so use it sparingly. Rosemary is generally added at the beginning of the cooking process. It pairs well with other herbs and would be wonderful in a marinade with garlic, oil, and wine. Because rosemary has such a strong fragrance it also works well in wreaths, sachets, or bouquets.
Thyme
There are many varieties of thyme and all have a place in your garden. Ornamental varieties of thyme can be planted at the edge of the garden, along a wall, in containers, between steps in a walkway, or as groundcover. Culinary varieties (lemon and French) can be planted in your garden or in a containers. This evergreen perennial is very versatile.
Growing Thyme
Thyme needs full sun to grow well and should be planted in well-drained soil with a pH of about 7. It prefers slightly alkaline soil conditions so if your soil is slightly acidic add lime to increase the soil pH. Add limestone gravel or sand to improve soil drainage and prevent root rot. Thyme does not do well in soggy conditions. The plant is pretty low maintenance other than a light pruning once a year. Prune shortly aft the last spring frost to prevent the plant from getting woody and brittle. Cut the plant back by one third, cutting above the new growth not below the woody stems. However, the more you trim it the more it will grow. Stop clipping about a month before the first frost of the fall to ensure there is not too much tender new-growth when the frost hits.
The plant begins to flower with tiny blossoms that bees love. This happens in the spring and summer. Try to harvest any leaves you may want to use before the flowers bloom as the flavor of the leaves is more intense before the plant flowers.
Harvest and Preservation
Harvest thyme any time you’d like. Cut stems down toward the center of the plant and leave at least five inches to allow for more growth. Strip the leaves from the stems and discard the stems before using. Thyme has a nice lemon flavor and is great in butter, or mayonnaise. It can also be used on vegetables, soups, beans, stews, meat, seafood or sauces.
Thyme is one of those herbs that does not lose much flavor when dried so you can harvest all at once and dry the leaves rather than taking them as you need. Extra leaves can be saved by drying, freezing, or preserved in vinegar.
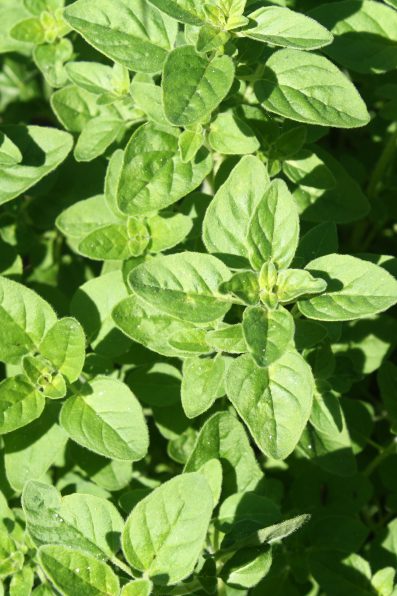
Oregano
Oregano is a hardy perennial plant with a very strong flavor. It is a beautiful anchor plant that looks lovely in landscaped gardens along the edge or in a container spilling over the edge. It is a relative of marjoram.
Growing Oregano
Oregano grows best in full sun in well-drained soil with a pH between 6.5 and 7.0. In zone 7 and warmer plant in a location that is shady in the afternoon to protect from the scorching midday sun. No fertilizer, or soil amendment is necessary as oregano grows best in moderately fertile soil. Plant in the spring spacing eight to ten inches apart. Oregano can spread easily; in late spring cut it back to 1/3 its size. This will encourage more growth and you’ll get a bushier plant.
Harvest and Preservation
Harvest often for continued growth as soon as the stems are four inches long. The flavor of the leaves is the strongest before the plant flowers and blooms; this is the best time to harvest leaves for drying.
Dried oregano has a very strong flavor and is more intense than fresh. It is one of the best herbs to dry. Fresh oregano can also be preserved by freezing. Use oregano in Italian or Greek dishes, on meats, eggs, tomatoes, beans, and vegetables. Fresh oregano should be sprinkled over the dish at the very end. Consider adding fresh oregano to a salad. Dried oregano can be used earlier in the cooking process.
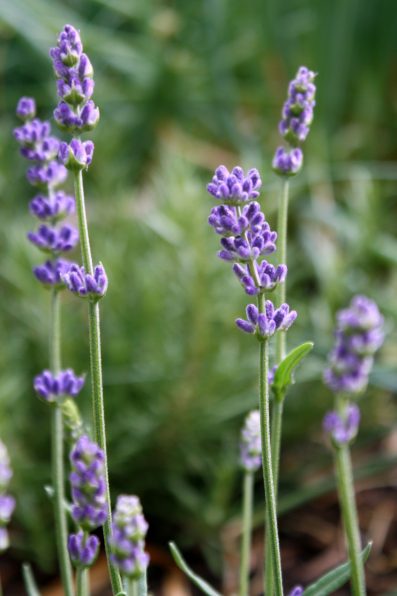
Lavender
Lavender is a perennial plant with a wonderful fragrance usually associated with soaps and lotions. It is rich in essential oils which makes it great in cooking as well. It grows to about two feet tall and is a great plant for landscaping as the vibrant purple flowers contrast beautifully with the gray-green foliage.
Growing Lavender
Lavender should be planted in the spring after all danger of frost has past. It needs full sun with well-draining soil with a pH of 6.7 to 7.3. It likes drier soil so be sure not to over water it. Soil that is heavy with water will kill the plant. To help with drainage mix in sand or small gravel, plant in containers or raised beds, or mound the soil. Consider adding rock mulch to speed evaporation to prevent soggy soil. Space plants 12 to 18 inches apart.
Harvest and Preservation
Flowers, leaves, and stems of the plant can be harvested at any time by cutting long stems from the plant. Avoid harvesting more than one third of the plant at one time to keep the plant looking full. Fresh lavender can be used to make flavored honey, flavored cream, in baking, sauces, and marinades. Dried flowers and leaves can be used to make teas, sugars, salts, rubs, and potpourri. Extra flowers and leaves can be saved by freezing or drying. Dry flower with the stems attached for easy handling. Flowers will hold their color better when air-dried.
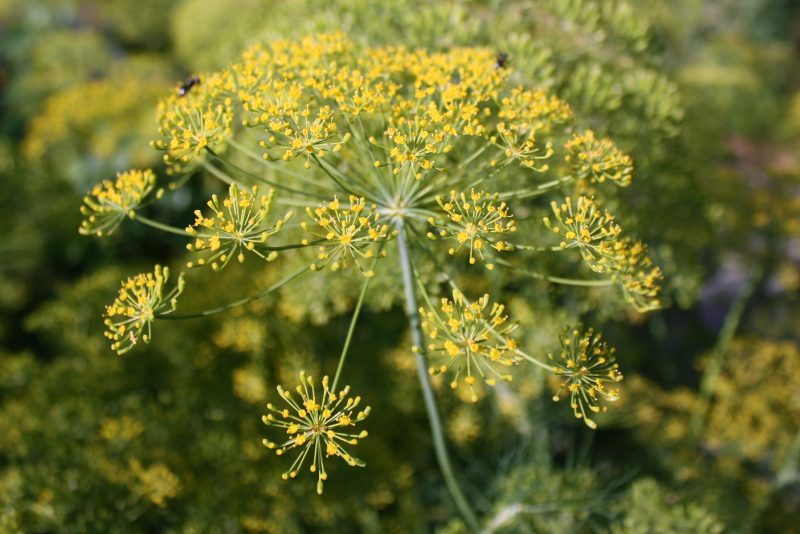
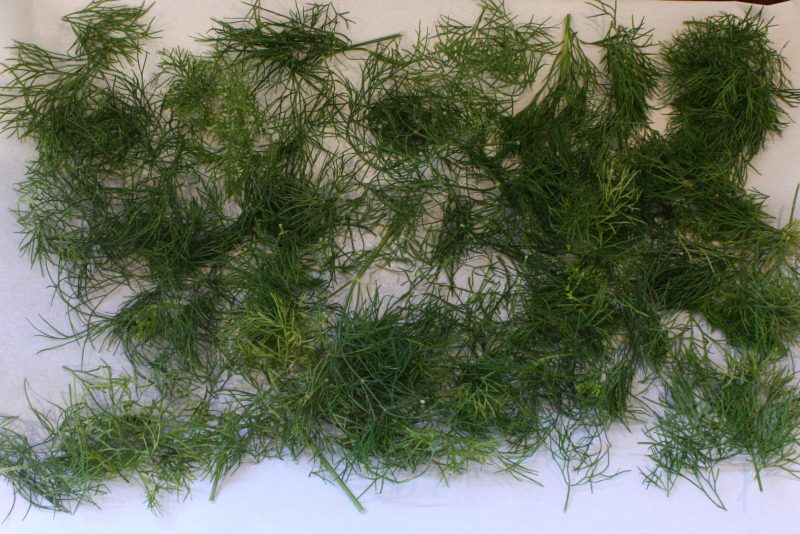
Dill
Dill is an annual with light, feathery leafs and yellow flowers that bloom in the spring. The stems are tough and slender and the plant grows to a height of about 2 to 4 feet. Because of its height and size it is a good plant for the back of the garden. Plant dill somewhere that has lots of room for the plant to reseed. Plant it in a place where it will receive full sun in well-draining soil with a pH between 5.5 and 6.5. Enrich the soil with organic matter before planting to improve the richness. Plant in the spring after danger of all frost has past. Dill likes mild weather, but will still survive hot weather, so it can be planted again for a fall crop if you’d like. Plants should be spaced 12 to 15 inches apart.
Dill plants will die in the first frost, however if the plants went to seed before it dies, the fallen seeds will produce new plants in the spring. Seeds don’t follow boundaries in flower beds and new plants will often pop up anywhere. Dill is sometimes called dill weed due to its tendency to spreading like a weed.
You may harvest the dill leaves or flowers at any time. You may also collect the seeds to eat or replant. Dill is great with fish, root vegetables, salads, marinades, salad dressing, pickles, sauerkraut, breads, or mixed into sour cream for a vegetable dip. Add fresh dill to dishes at the end of cooking. It has a very strong flavor, but will lose its flavor with heat. Extra dill may be dried, frozen, added to vinegar, or mixed into butter. Dill is an excellent herb to dry as it doesn’t lose much flavor.
Cilantro
Cilantro is a quick-growing, aromatic annual that is versatile as you can use the whole plant. The leaves of the cilantro plant are similar in appearance to the parsley plant. They both have tender, lacy leaves. When the plant begins to seed it sends up long flower stalks with flat blooms of white or sometimes pink flower blossoms. These flowers produce the coriander seeds which can be saved to plant next year or consumed as the coriander spice. The plant grows quickly in cooler weather (spring and fall) and quickly goes to seed when the weather gets hot. Plant cilantro in your garden in a space where you can let it go to seed after you have harvested the leaves.
Growing Cilantro
Plant cilantro in a location what will receive full sun in well-draining soil with a pH of 6.2 to 6.8. In very hot climates the plant will tolerate light shade, specifically shade during the hot afternoon hours where the sun in the most intense. Space plants 12 to 18 inches apart planting seeds in the spring, about a month before the last frost. In the fall plant about a month before the first frost. Cilantro is one herb that grows best from seeds. Transplants don’t do as well.
Unlike other herbs like basil or parsley, picking the flowers off the plant does not extend the life of the leaves. When the cilantro plant begins to flower the leaves become scarce and very bitter and are not enjoyable to consume. If you’d like to enjoy cilantro all summer long you will need to plant new seed successively every 3 to 4 weeks until the weather gets warm in the spring or the first frost of the fall. If you allow your plant to go to seed (and don’t pull it before then) and don’t collect the seeds some may fall from the plant and send up new plants later in the season or the following spring.
Harvest and Preservation
You may begin to harvest the leaves and stems of the plant once they reach six inches in height. Harvest by cutting the stems at the ground level. You many consume the leaves and the stems. Both are similar in flavor with the stems being more intense. Don’t cut more than one third of the stems and leaves at one time as you may weaken the plant.
You may harvest the seeds after they form by clipping the seed head, which will be brown, and hanging upside down in a paper bag. The round husks will dry and split in a few days dropping the seeds to the bottom of the bag. Clip the seed heads as soon as you are able.
Add fresh cilantro at the end of dishes. Heat will destroy the flavor. Use it in guacamole, fresh salsa, curry, chicken dishes, relish, and pickles. Fresh cilantro blends will with mint, garlic, and chives. Extra leaves can be preserved by freezing. Dried cilantro leaves lose their flavor. Coriander seeds can be saved in a cool, dry, and dark locations such as a spice cabinet. The seeds can also be saved in the refrigerator.
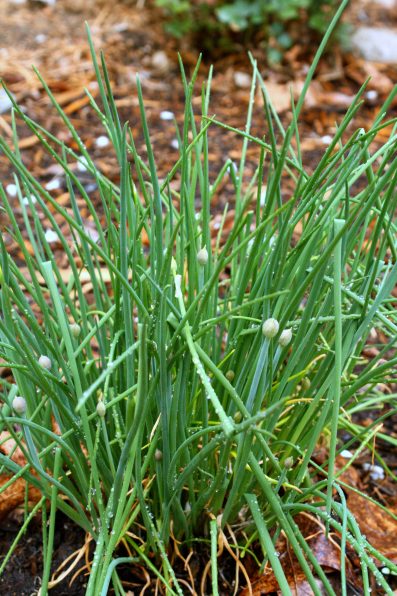
Chive
Chives are an easy-to-grow perennial that has a mild onion flavor. The leaves and flowers, and even the bulbs can all be consumed. Chives have tall, hollow leaves with a grass-like appearance and look great along borders, in flower beds, and in herb gardens. They also grow well in containers and can be taken indoors when the weather gets cold.
Growing Chive
Plants chive seedlings in a location that receives full sun when the ground is at least 65 degrees Fahrenheit. If you are growing chives from seed plant in early spring, about 4 weeks before the last frost, spacing plants 8 to 12 inches apart. Chives grow best in loamy, well-draining soil but are hardy enough to grow in poor soil. They don’t need any other care than watering. When the plant is 3 to 4 years old and has grown into large clump it can be divided into smaller plants. Plant the smaller plants in another location.
Harvest and Preservation
Harvest leaves as soon as they are tall enough to cut, about six inches. Cut leaves from the outside of the plant leaving at least a half an inch above the soil. Flowers can be harvested as soon as they grow. The leaves will not survive the first frost and freeze of the season. After they die back remove the dead foliage.
Use fresh chive leaves or flowers in soups, salads, potatoes, vegetables, omelets, herb butter, and oils. Add fresh chives at the end of the cooking process as heat will destroy the flavor. They pair well with parsley and tarragon. Extra leaves can be frozen or dried. Dried chives lose some flavor so freezing is best. Chives flowers make an excellent flavored vinegar with a lovely pink color.
Tarragon
Tarragon is low-shrub perennial that looks like tall grass. It has flat, slim, glossy leaves that grow on branched stems 18 to 24 inches tall. It has a delicate, licorice flavor and is generally used as a finishing herb when fresh. The plant does not flower and looks lovely in a flower bed as a contrast to bright flowering plants. Tarragon does not spread and will not reseed so it is pretty easy to manage.
Growing Tarragon
Plant tarragon from a transplant in the spring after all danger of frost has past. Pick a sunny location that is shaded in afternoon when the sun is the hottest. Tarragon grows best in loose, well-draining soil with a pH around 7. Mix in organic matter before planted to enrich the soil. Tarragon is drought-tolerant so it does not need to be watered too often. Beware of over-watering as that may lead to rotting roots.
After the first freeze of the winter the tarragon plant will turn brown and go dormant for the season. Cut back the dead foliage in the spring to make room for new growth. After three or four years if the plant is doing well divide it into smaller plant and replant. Divide every third year to renew.
Harvest and Preservation
Harvest tarragon leaves regularly by cutting stems down to six inches above the ground. Cut back half the plant in early summer so the plant will grow full and will produce a continuous harvest all summer long. Extra leaves can be preserved by freezing, drying, or added to vinegar. Be sure not to dry the leaves for too long or they will lose their flavor.
Fresh tarragon is generally added at the end of the cooking process as a finishing herb. Heat will destroy the delicate flavor. Tarragon tastes great on eggs, chicken, mixed in a salad, vegetables especially tomatoes, cheese, fish, and sauces.
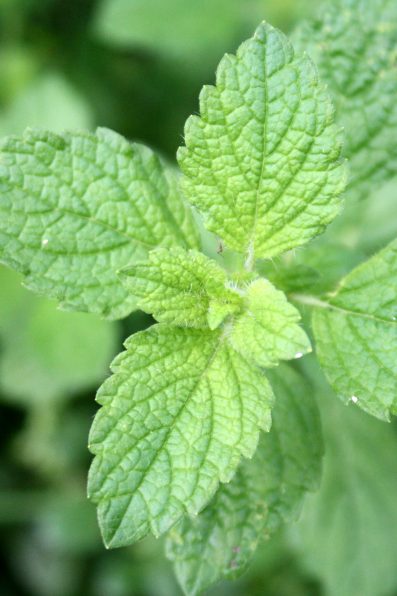
Mint
There are many types of mint (spearmint, chocolate mint, sweet mint, peppermint) and they are all easy to grow. Mint spreads easily so plant it where it has room to grow. Mint spreads by sending out runners which form new plants. It will quickly produce large patches of lush, green leaves. It works great as a ground cover between paving stones on a walking path. You can also try to contain mint by planting it in a container.
Growing Mint
Mint should be planted as a transplant in the spring after all danger of frost has past. Space plants 18 to 24 inches apart. Select a location that receives full sun or partial shade. Mint prefers damp, rich soil with a pH between 6 and 7. Be sure to keep mint well-watered. You can keep mint contained by picking leaves regularly and by trimming runners that spread further than you’d prefer. The plant develops flowers during the summer. Trim theses flowers before they open to keep the plant compact. Mint is a perennial and will die back in freezing temperatures. It will return the following spring.
Harvest and Preservation
Harvest at any time by pinching off the desired quantity of leaves. The flavor of the leaves will be most intense right before it blooms. If you wish to harvest at this time cut the whole plant back to the first set of leaves. This will cause the plant to grow bushier. You should be able to harvest in this manner three times per season.
Fresh mint goes will with lamb, fish, chicken, and vegetables such as peas, carrots, and baby potatoes. Add leaves to green salads, fruit salads, ice tea, and lemonade. Extra leaves may be saved by drying or freezing. Freezing is recommended as dried mint leaves are less flavorful. Mint is also an excellent herb to use for flavored vinegar.
How to Preserve
Most people think of drying as the way to preserve fresh herbs. This is a great method and should definitely be used for some herbs. Others, however lose a lot of flavor and don’t add much to your dish.
Drying
Drying is the tried and true method for preserving herbs. This method is best for rosemary, sage, thyme, oregano, dill, tarragon and lavender. Other herbs such as parsley, mint, and basil can also be dried, but might not be as flavorful.
There are three methods you can use to dry your herbs. The classic way is to air dry them. Take a bundle of clean, dry herbs and tie the stems together on one end. The leaves should be still attached. Hang the bundle in a dry, dark, well-ventilated place. If you are worried about dust you may cover the bundle with a paper bag, be sure to leave enough room in the bag for air to circulate. Hang the bundle until leaves are crumby, about 1-4 weeks. When the leaves are dry remove from the stem and store in an air-tight container. Herbs with thick, succulent leave such as basil and parsley won’t air-dry well. For those herbs use an oven or dehydrator.
If you don’t have the space or the time to air dry herbs you may dry herbs using your oven. Place washed and dried herbs on a backing sheet. Cover the baking sheet with parchment paper first; the metal of the pan could affect the taste of the herbs. Place in the oven at the lowest possible temperature and leave until the leaves are crumbly. This may take 1-4 hours.
The last method for drying herbs is to use a food dehydrator. Follow your machine manufacturer’s instructions. Drying will take anywhere from 12-24 hours.
Freezing
Freezing herbs is a good way to preserve the essential oils in the plant which will make for a more flavorful addition to your meal when it comes time to using the herbs. There are several ways you can freeze your herbs. You can freeze the leaves individually, with the leaves on the stems, or chopped in water or oil. Freezing works well for rosemary, parsley, basil, cilantro, tarragon, rosemary, thyme, sage, oregano, dill, and lavender.
For herbs that have small leaves on sturdy stems, such as rosemary, lavender, tarragon, and thyme it is easiest to leave the leaves on the stems. For herbs with tender or larger leaves, such as sage, basil, dill, parsley, cilantro, and chives, freeze the leaves individually, whole or chopped. Lay clean, dry herbs on a baking sheet and place in the freezer until frozen. Transfer to a freezer bag for long-term storage. You can then pull out stems and pull off leaves from the freezer as needed when cooking.
Another option is to freeze chopped herbs in oil or water. Pack chopped herbs into ice cube trays until 2/3 full. Top each tray with water, oil, or broth and place in the freezer. Once the cubes are frozen transfer to a freezer bag for long-term storage. These cubes will last for months and they are great to add to a soup for a burst of flavor at the end. Herbs that can stand a lot of cooking such as rosemary, thyme, oregano, sage, can be frozen in oil to be used as the base oil of a dish, such as browning onions. This method will not work for more delicate herbs such as basil, parsley, cilantro, mint, and dill. For those herbs freeze whole or chopped.
Chopped, frozen herbs such as basil or chives can be sprinkled on foods at the end of the cooking process. The heat of the warm food will thaw the herbs and add fresh flavor to your winter meal, such as chives sprinkled on a baked potato.
Vinegar
Herb vinegars are not only pretty, but are also delicious and a wonderful way to get more flavor out of your herbs. Herb vinegars are great for salad dressings, marinades, vinaigrettes, or in any recipe that calls for vinegar.
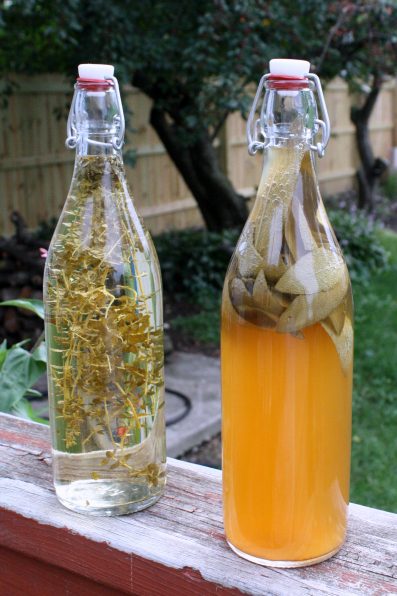
To make an herb vinegar select a glass container with a cork or rubber lid. Do not use metal lids as the vinegar will corrode the lid. Use mild-flavored vinegars, such as white wine vinegar, for delicate flavored herbs, such as dill, mint, chive blossoms, or tarragon. Use strong-flavored vinegars, such as apple cider vinegar, for more robust herbs such as rosemary or sage. You can use a combination of herbs or just one type. Use a ratio of ½ cups of herbs to 2 cups of vinegar. Wash and thoroughly dry the herbs. You may keep the leaves on the stems. Add the herbs to your chosen glass container and top with room-temperature vinegar. Store the bottle in a cool, dark place and let the herbs steep for 1-4 weeks.
White wine vinegar and tarragon are a classic combination. Chive blossoms steeped in white wine vinegar create a lovely pink vinegar that is delicious in salad dressing.
Herb Butter
Herb butters are another flavorful and easy way to save your herbs. Herb butters are exactly what they sound like, butter with herbs mixed in. Mix 1 part minced herbs with 2 parts softened butter. Shape the butter into a log, wrap in plastic wrap and freeze. Herb butters will last in the refrigerator up to two months and in the freezer for up to six months. Shave a slice off to melt over and flavor meat, fish, or vegetables. Garlic and parsley is a great combination and makes delicious garlic bread.
No Comments